WooCommerce is a free e-commerce plugin module for WordPress and is popular especially among small businesses to run online stores. If you use WooCommerce, you may wish to collect extra information about customers, or display extra information about your products and services in a clear organized manner. The extra information is stored as custom fields so you can display them the way you want. CIO Custom Fields for Woo: Customers, Members and Products is a tool to help you to manage custom fields and display them automatically without PHP code.
WooCommerce makes it really simple for customers to register for an account by providing an email address with optional username and password, if you have enabled registration at My Account page. Customers can provide more details at the checkout page. In some cases you may want to change the work flow and require customers to provide more details at registration. The free version of CIO Custom Fields for Woo enables WooCommerce’s builtin fields at registration automatically without user input. This tutorial demonstrates how to edit, add or remove custom fields in WooCommerce, using the free version of CIO Custom Fields for Woo, and another free plugin called Pods. CIO Custom Fields for Woo Professional version provides more features and the process of editing custom fields are the same as the free version.
For the sake of this tutorial, we will assume the following:
* you have installed WordPress and the WooCommerce plugin
* you know what are plugins (WordPress extension modules), and how to install and activate new plugins.
If you are totally new to WordPress or don’t know how to install new plugins, you may find information or tutorial and come back to this tutorial later. A good place to start would be WordPress documentation, or WordPress support forum.
Preparation for Editing WooCommerce Custom Fields
The following plugins need to be installed and activated for this tutorial.
* CIO Custom Fields for Woo
* PODS
Both plugins are available for free download from WordPress plugin repository. After activating CIO Custom Fields for Woo, if you enable registration at My Account page in WooCommerce settings, WooCommerce’s default fields of customers should appear automatically.
Edit Custom Fields of WooCommerce Customers
* Look for User in Pods
PODS is a plugin to manage content types and custom fields in WordPress, primarily used by website developers. User is one of the content types that can be extended and managed with Pods. Don’t worry we will only use the graphical user interface to make changes to the custom fields. You can still accomplish this task without any programming knowledge or experience. If you are keen to know about about PODS, more information is available from PODS official website.
After you have activated the Pods plugin, a menu link (Pods Admin) will appear at the bottom left hand corner of the screen.
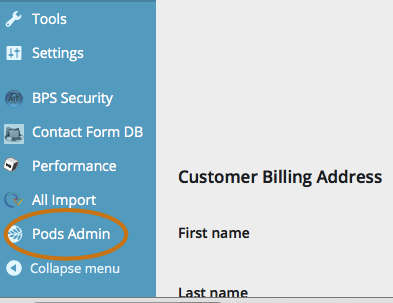
Click on the Pods Admin link, and you will see the following screen. WooCommerce Customers are essentially WordPress users with the assigned role of “customer”. Please look for “User” in the screen as shown below. If you have never used Pods before, there should be only one item (User), which was created when you installed CIO Custom Fields for Woo.
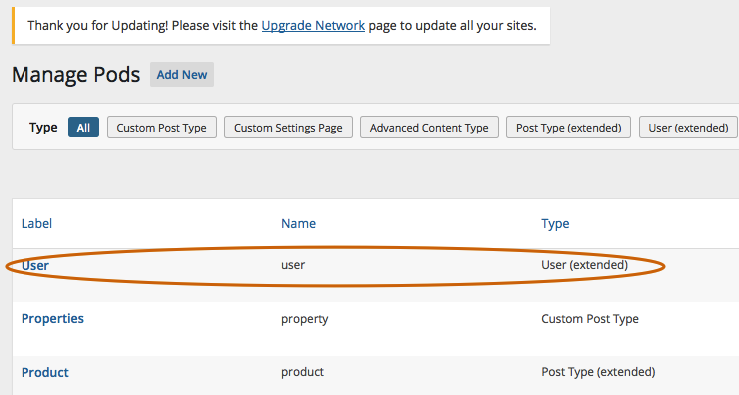
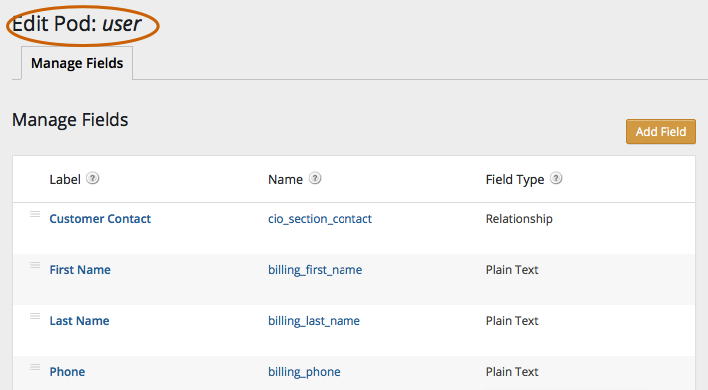
Click on the “User” link in Manage Pods screen, you will see the following screen .
* Editing custom fields for WooCommerce
When you are on the screen called Edit Pod: user, you will see a list of the custom fields used by CIO Custom Fields for Woo. As the column name suggests, “label” is the label we see on the website, “name” is the actual name used to refer to a custom field. You may click on a field name to view the field details, and click on the field name again to hide the field details.
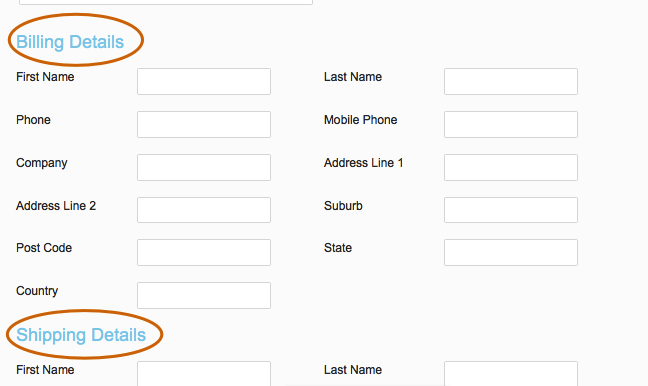
You will notice the custom fields start with different prefix. Custom fields starting with “billing_” are treated as information to appear in product orders and invoices, and the custom fields starting with “shipping_” will appear in packing lists. Fields starting with “cio_section_” are internal fields used by CIO to produce a label without input cells in the registration form.
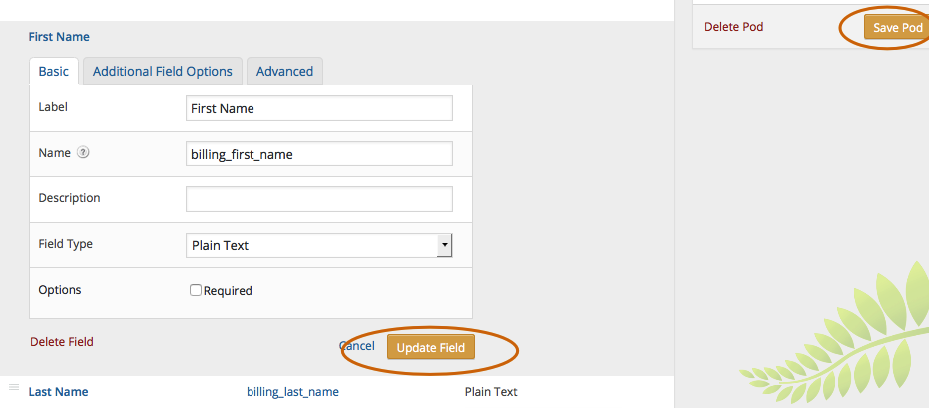
If you would like to change the label or add help text to a certain field, you may click on the field and make changes as shown in the screen above. After making changes, please remember to click on “Update Field” button, and then click on “Save Pod” button. If you don’t click on Update Field button, the changes you have made to the field will not be saved.
* Adding new custom fields for WooCommerce
Adding new custom fields to WooCommerce is a straight forward process. At the top and bottom of the screen, you will see Add Field button. Click on the button, and you will see a screen below.
It is a good practice to name your custom fields after WooCommerce’s pattern, starting with billing_ or shipping_ if you want these fields to appear in product orders/packing list. This will help you to manage the custom fields as your business and the number of custom fields grow.
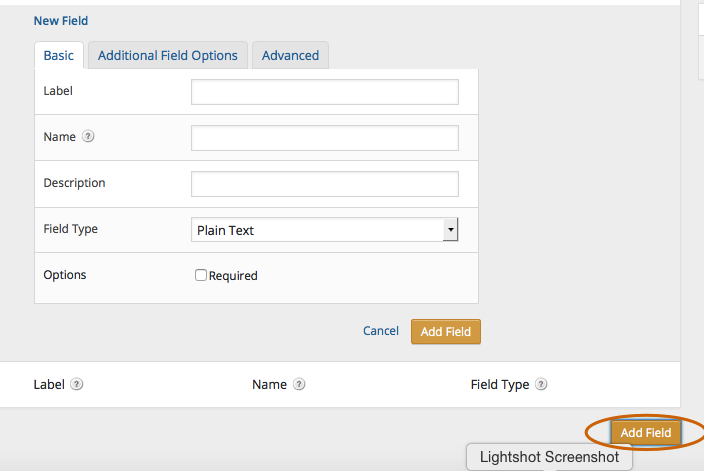
The free version of CIO Custom Fields for Woo only supports text fields. You may leave the field type as the default “plain text”.
CIO Custom Fields for Woo professional version supports more field types, such as radio button, check box, drop down list, file upload. If you need these features to provide a better customer experience, please consider upgrading to the professional version of the plugin.
If you move your mouse over a field name, you will see some menu links: Edit, Duplicate, Delete. You may click on duplicate so the field name and label are copied. You may then make changes to the field label and name before saving.
Please remember to click on Add Field button, and click on Save Pod button to save to the database.
Deleting Custom Fields for WooCommerce
If you move your mouse over a field name, you will see the following menu links: Edit, Duplicate, Delete. Click Delete, and you will be able to delete the field. Please remember to click “Save Pod” button to save the changes.
After you click on the delete button, you can still change your mind before clicking on the Save Pod button. Just refreshing the page, and the page will appear again. Clicking on Save Pod button will save the changes to the database.
If you want a field back, you can always create a new field and give it the same name or label.
Changing the sequence of custom fields for WooCommerce
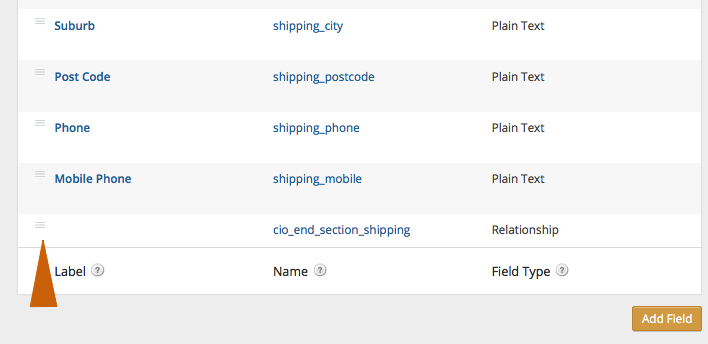
At the left of custom fields, you will see three bars as shown below. You may click on it, hold the mouse button and drag it upwards or downwards, and drop to the new position.
Please remember to click Save Pod button to make the changes take effect.
 Displaying Custom Fields
CIO Custom Fields for Woo searches the database and automatically display custom fields in registration, checkout, user profile page. The professional version enables custom fields in My Account page so customers can update their own information in My Account page.
The changes to the custom fields you make in this tutorial will take effect automatically. You needn’t do anything else to display the custom fields. This is the reason of using CIO Custom Fields for Woo, isn’t it?
Summary
As shown in this tutorial, you may add unlimited WooCommerce custom fields, delete the ones you don’t need, update the label, and change the sequence of these fields in the forms. With CIO Custom Fields for Woo, you will have full control and make WooCommerce truly yours.
CIO Custom Fields for Woo only supports text fields. At times you may wish customers to choose from a predefined list of answers rather than type answers. You may wish to collect extra information from a certain group of customers (such as wholesalers). If you run a membership site or a website matching supply with demand, you may wish to grant access to certain information to certain customers.
CIO Custom Fields for Woo Professional edition offers extra features and may meet your needs. In addition to custom fields of customers, CIO custom fields for woo professional edition also enables you to manage custom fields of your products. The custom fields you added to products will be displayed automatically, according to the rules you defined in the admin panel. Please contact us to know more about integrating CIO Custom Fields for Woo professional edition in your next project.
What Is Next?
Pods is a powerful framework that can do much more than saving custom field definition to a database as shown in this tutorial. It is a framework to build high performance content management system on WordPress platform. Your website can potentially speed up by a few times by changing custom fields storage and running optimised queries. The actual performance enhancement depends on how you use your custom fields and how you store custom fields. If your website is struggling with increasing number of custom fields, please contact us for an obligation free consultation of optimising your website. In many cases you can keep the appearance of your current website, with a much better engine to power your online system as your business grows.
Some of your business processes can be automated to save you significant time and money in the long run. This is especially the case where labor cost is high. CIO Custom Fields suite of tools are designed for small and medium businesses to have a high performance online presence with low running/maintaining cost. These tools are part of the solution to turn spreadsheet based data into automatically updated online system. Please contact us to find out how your business can benefit from our suite of tools.
Hi I want to find out if I can add a field asking for users’ bank account and sort codes so that my woocommerce based plugin can pick up that field to disburse their money into their accounts
Hi Amy,
Thanks for your interest. You can add custom fields to collect information from users or suppliers. If you want another plugin to use the collected information, you need to use the same name for the custom field that the other plugin uses. For example, WooCommerce retrieves billing address from the field “billing_address”. so the custom field at registration page needs to be named “billing_address” for WooCommerce to use later.
Our premium version supports more custom field types and options in controlling what fields are shown depending on the user’s role. For example you can create additional user roles such as members, suppliers, and show different forms when they log in. We may also customize the plugin to seemlessly integrate with your other plugins. Please let us know if you need further help. best regards.
Oliver