Have some exciting new ideas to share and want others to see the discussion thread? Grab your smart phone, take a photo, or shoot a short video, and upload to the WordPress blog comments. You will interact with readers and customers in a whole new way.
A picture is better than 1000 words. Multimedia is even better. You can encourage your readers to upload multimedia files in comments, and provide extra information through custom fields. Imagine what you can achieve with the increased level of interactions with your readers, team members or customers.
This tutorial will show you how to allow readers to upload multimedia files to your blog comments. For the sake of this tutorial, we will assume the following:
* you have installed WordPress,
*you know how to publish posts, and approve or reject comments.
* you know what are plugins (WordPress extension modules), and how to install and activate new plugins.
If you are totally new to WordPress or don’t know how to install new plugins, you may find information or tutorial and come back to this tutorial later. A good place to start would be WordPress documentation, or WordPress support forum.
Preparation
The following plugins need to be installed and activated for this tutorial.
* PODS
PODS is available for free download from WordPress plugin repository.
CIO Multimedia Comments extends PODS to deliver some features. Please activate these two plugins before proceeding to the next steps.
Step 1. Extending Comment with PODS
PODS is a plugin to manage content types and custom fields in WordPress, and is primarily used by website developers. Please relax if you are not a website developer. We will only use Pods’ graphical user interface to create a few custom fields. You can still accomplish this task without any programming knowledge or experience. If you are keen to know about PODS, more information is available from PODS official website.
One of the unique features of PODS is that it can extend WordPress built-in content types (user, page, post, media, comment etc), and content types (custom post type) created by other themes or plugins. “Comment” is a WordPress built-in content type. Our first step is to extend the content type “comment” using Pods.
After you have activated the Pods plugin, a menu link (Pods Admin) will appear at the bottom left hand corner of the screen. Your menus may look different depending on what plugins you have installed, and which color scheme you have chosen in your theme.
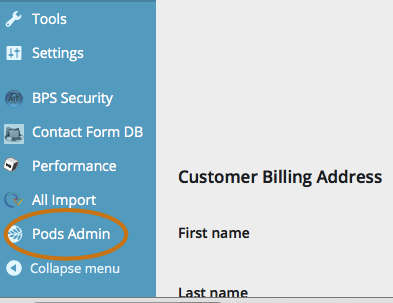
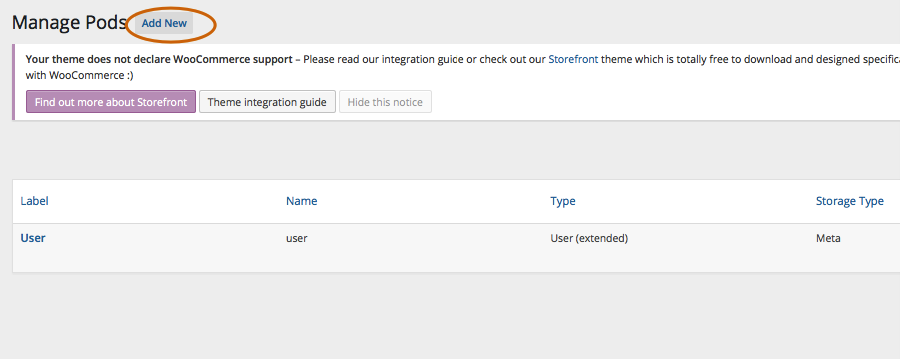
Click on the Pods Admin link, and you will see the following screen if there are already Pods content types in your blog. (Some of our plugins automatically create Pods content types during installation.) Your computer may take you to the next screen if you have no content types. Please click on “Add New” link next to “Manage Pods” heading. Just in case you are curious what is “pod”, it is a nickname for content type in this context.
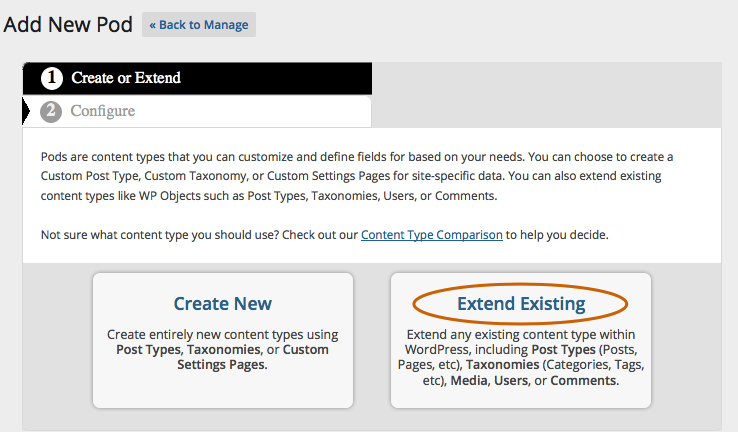
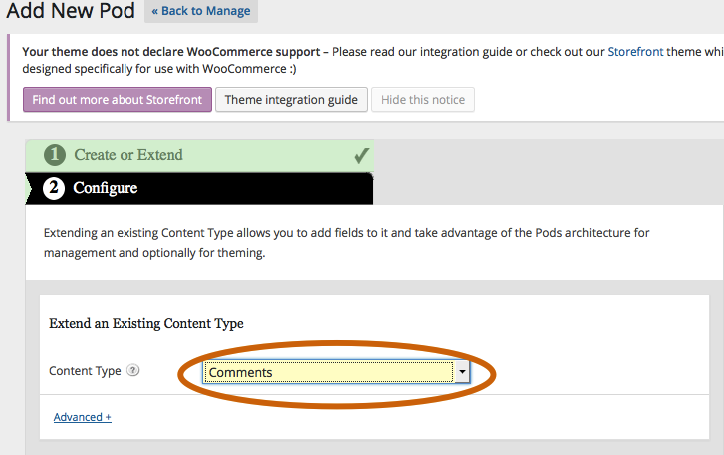
After clicking on Add New link, you will see the following screen. Please click on Extend Existing as we are going to extend comment as a content type.
The next screen will prompt you to choose content type and post type to extend. Please leave content type as the default Post Types, and choose “Products” from the second drop down list, as shown below.
Click Next Step button, and PODS will complete the extension, normally within a few seconds. You will see the next screen after extension has been completed successfully.
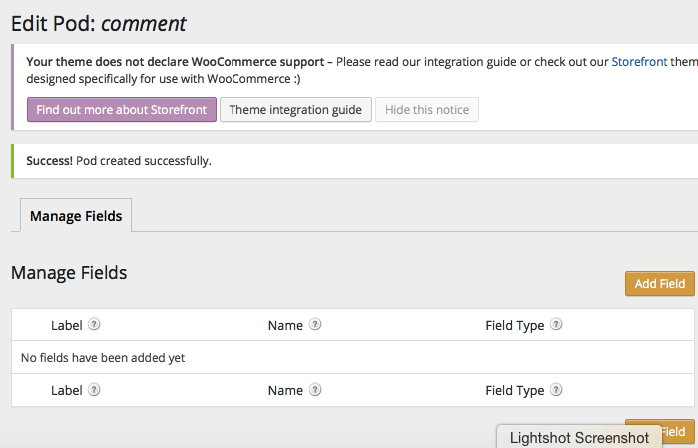
When you extend the content type “comment”, there is no custom field yet. Let’s create a few custom fields to collect more information from readers when they fill in the comment form.
Step 2. Setting Up Custom Fields of Comments
* Adding new custom fields for comment
Adding new custom fields to WordPress comment is a straight forward process using Pods graphical user interface in the admin panel. At the top and bottom of the screen, you will see Add Field button. Click on the button, and you will see Manage Fields screen below. Type in label and field name of your choice, click on Add Field button below the edit screen to finish this field. Field name will be used to reference the field and should always be lower case following MySql convention. (MySql is the name of a database that powers many WordPress websites.)
TIPS: when you click on Add Field button, the field configuration is not saved to the database yet. To save the field configuration to the database, you need to click on the Save Pod button to the right of the screen. If you leave this page without clicking on Save Pod button, you will lose field configuration you have entered.
You may choose from the following list of field types. Each field type comes with options for you to configure to better meet your needs. If you are not sure about a field type, just create a custom field with default options, (ideally in a test environment), and see how it works. You can change the options later.
- Date / Time – Date, Time, or both
- Number – Plain Number or Currency
- Text – Plain Text, Website, Phone, E-mail, or Password
- Paragraph Text – Plain Paragraph, WYSIWYG (TinyMCE or CLEditor, or add your own), or Code (Syntax Highlighting)
- Color Picker – Choose colors, because colors are great
- Yes / No – You can’t really go wrong with a checkbox, but we’ve added a few charms to make it stand out
- File / Image / Video – Upload new media or select from existing ones with our Media Library integration, or use a simple uploader, your choice
- Avatars – Upload new media or select from existing ones, automatically integrates with get_avatar calls for Users extended by Pods
- Relationships – Relate any item, to any item of any WP object type, another Pod, or a custom user-defined list — with bidirectional relationships
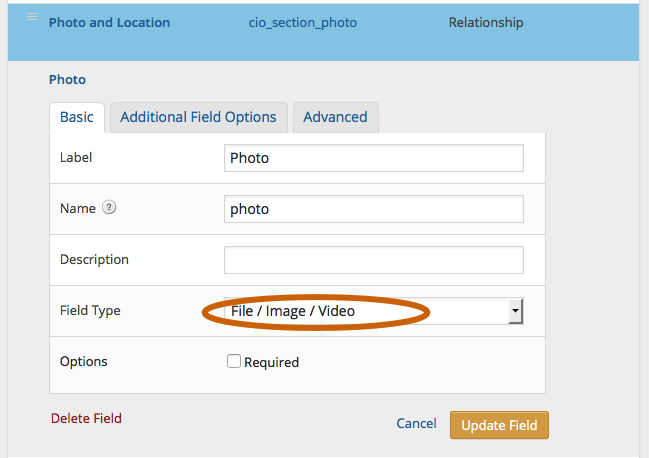
This tutorial focuses on how to allow readers to upload images, so you will need to create at least one custom field and set the field type as File. Let’s say we want to call the custom field “photo”, and label it “Photo” in the front end form. Here is the screen shot. Please set the field type as “File/Image/Video” as shown below.
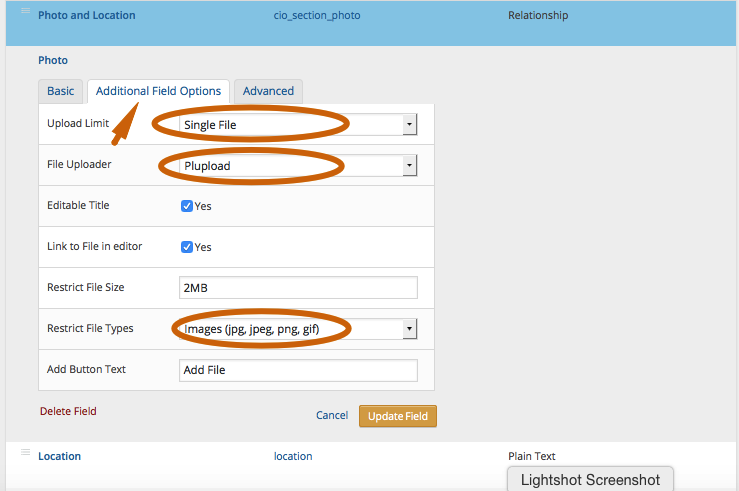
If you click Additional Field Options, you will see more options available for you to configure. Please set Upload Limit as Single File, set File Uploader to Plupload. WordPress has restrictions on who has access to the built-in Media Library. You probably don’t want subscribers and customers to mess up with your media library. Setting the uploader to Plupload allows subscribers and customers to upload files without giving them access to media library. The reason of setting upload limit to single file is that the free version of CIO Multimedia Comments only supports displaying single image. CIO Multimedia Comments free edition will ignore a field if it is set up as multiple file upload.
As for file type, please choose “Images”, which includes commonly used image formats. You may limit the size of the upload too.
Words of Caution
Internet can be fun and resourceful, at the same time it is also a jungle with malicious attackers looking for the next victim. Some scanning and attacks are automated and even the code author does not know which server or website the code is attacking. You may wish to restrict the type of files that can be uploaded at the front end, and restrict the access to uploaded files to users that you can trust.
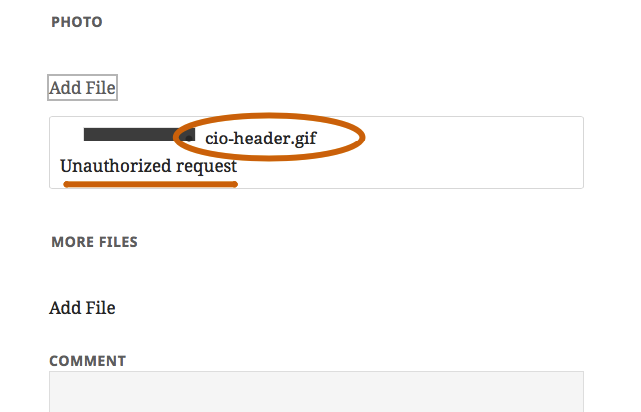
Pods has built in some security checks on the file types. The cio-header.gif in the screenshot below is a fake image. It is actually a script under disguise. The fake image is detected and prevented from uploading. So always place a restriction on the type of files you allow visitors to upload. If you need customers to upload a certain type of file, it is better to set a custom list of allowable file types rather than allowing any file types, and only display the file upload form after customers log in.
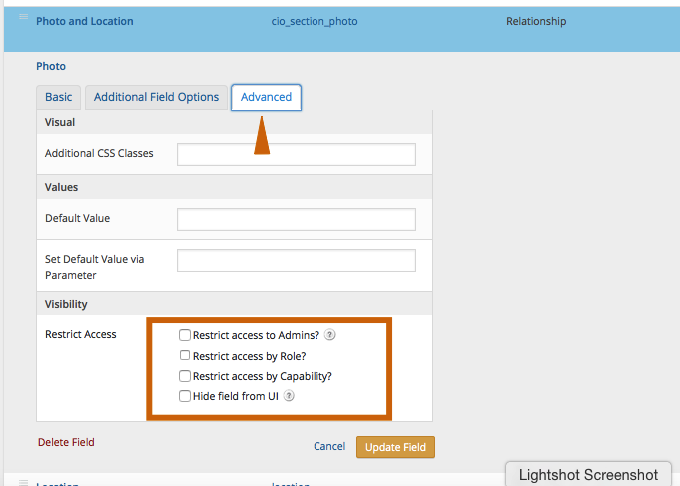
Now we are ready for some advanced and important settings. When you click on the “Advanced” tab at the top, you will see the following screen. If you are running a test on your popular live website, it is best to keep the new custom fields (the ones you are creating now) to administrator only for the time being. Once you are familiar about the field types and options, and are happy about how the new fields look in the comment form at the front end, you may come back and change this setting to show this field to the readers or customers. To restrict access to administrator only, you can tick the check box to the left. If you move your mouse pointer to the question mark at the right, stay there for a few seconds, some help text should appear explaining this option in more details.
Changing the sequence of custom fields of comments
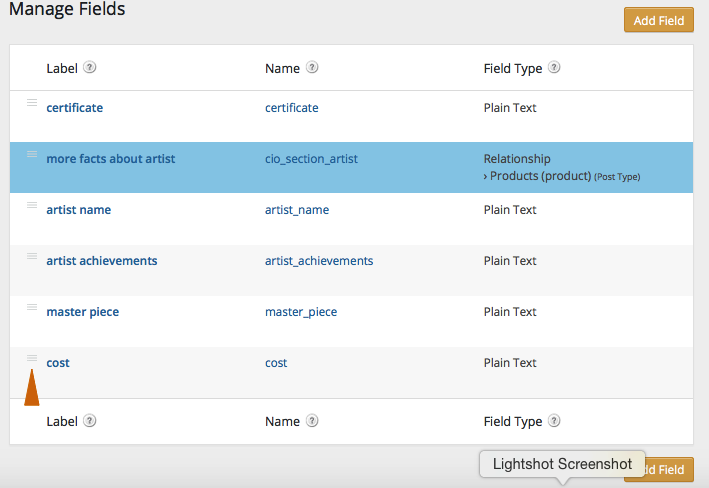
At the left hand side of custom fields, you will see three bars as shown below. These bars are not very obvious in some themes. You may click on it, hold the mouse button and drag it upwards or downwards, and drop to the new position. Please remember to click Save Pod button to make the changes take effect.
Duplicating a custom field of comment
When you move your mouse over a field name, you will see some menu links: Edit, Duplicate, Delete. You may click on duplicate so the field name and label are copied. You may then make changes to the field label and name before saving.
Please remember to click on Add Field button, and click on Save Pod button to save to the database.
Deleting Custom Fields of comment
When you move your mouse over a field name, you will see the following menu links: Edit, Duplicate, Delete. Click Delete, and you will be able to delete the field. Please remember to click “Save Pod” button to save the changes.
After you click on the delete button, you can still change your mind before clicking on the Save Pod button. Just refreshing the page, and the page will appear again. Clicking on Save Pod button will save the changes to the database.
If you want a field back, you can always create a new field and give it the same name or label.
Step 3. Creating a new comment
After you have set up the custom fields of WordPress comments in Pods, the fields will be automatically added to the comment form at the front end. These fields will appear in the comment list and the “edit comment” page at the back end. The fields are normally grouped as “More Fields” as shown below.
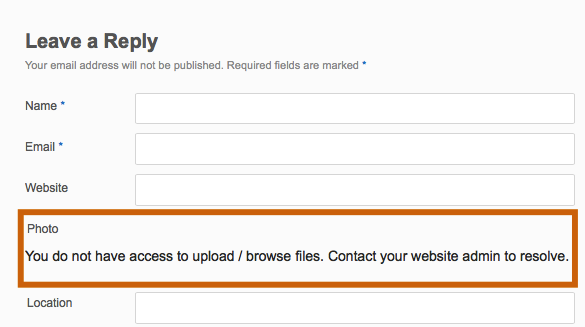 If you only allow administrators to access the newly created custom fields, visitors to your blog will not see the message in red box. They will see your usual comment form as if the newly created custom fields don’t exist. However if you don’t restrict access to the custom fields for image upload, visitors to your blog will see this message before they log in. The message will be replaced by a file upload button after they log in. This is a security feature of Pods but can be confusing to readers and customers. The premium version of CIO Multimedia Comments gives you more control over when, where, to whom and what to show in comments.
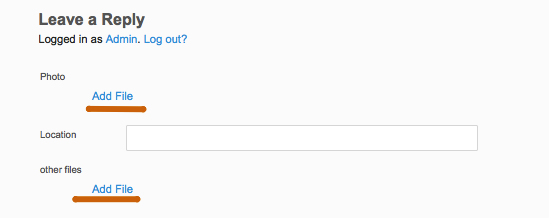
Below is a screen shot of new comment form. In this example, two file upload fields have been created, each field can store one file.
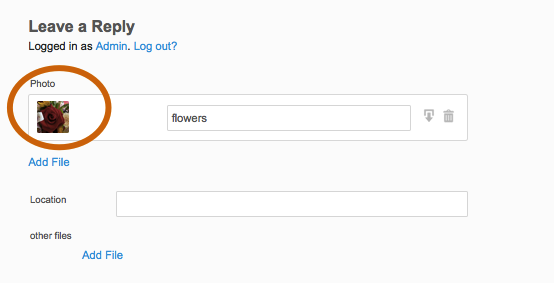
You may try uploading a photo from your desktop or mobile phone. Note it takes some time to upload big files, and a progress bar will be displayed to indicate how much has been uploaded. When the image file has been uploaded to the website successfully, an image icon will appear next to the image upload link. There are two icons to the right of the image title, you may click on the link to use the URL somewhere, or click on the trash icon to remove the uploaded file. Please remember to click “Post Comment” button at the bottom of the form to submit the comment.
If you submit the comment before the image icon appears, the image may not be successfully uploaded to the blog, or may not be correctly associated with this comment. This is a potential cause of unsuccessful media upload.
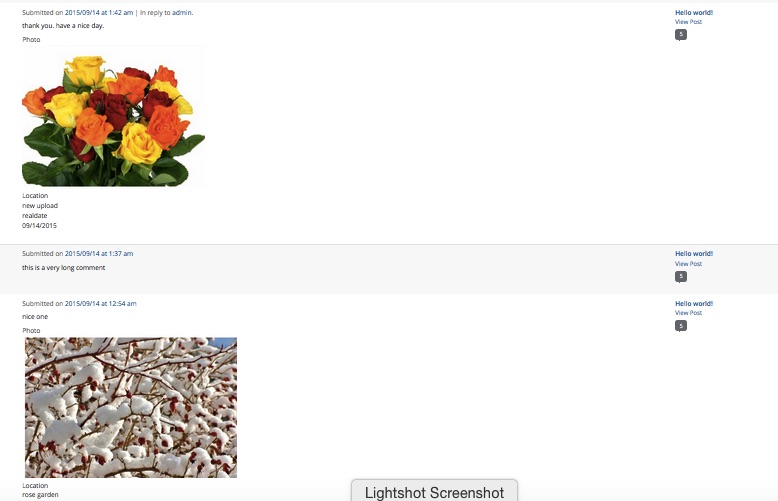
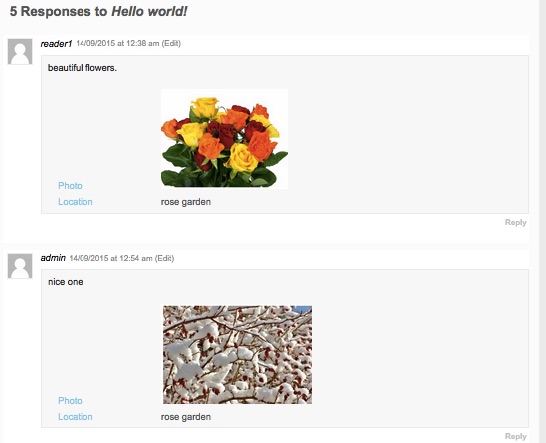
 If your image upload is finished, great. Now if you go to the admin back end, you will see a list of comments newly submitted, with the images, as shown below. You may use CSS to customise the display of the images.
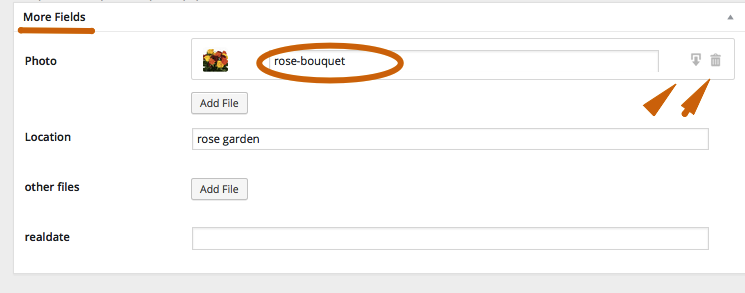
 If you click on a comment to go to to Edit Comment screen, you will see the custom fields, and the links to download or remove the uploaded images. You may then approve or disapprove a comment as you usually do.
Step 4. Displaying Images and Other Custom Fields in Comments
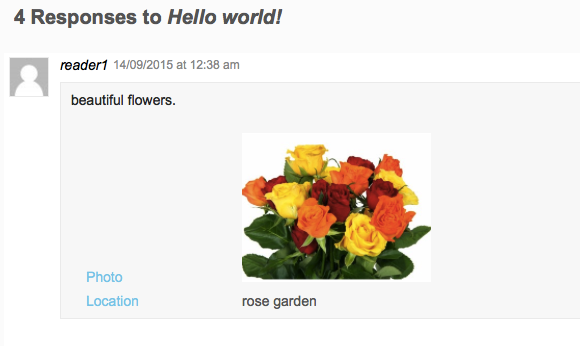
Once a comment is approved, all the submitted information and the images will display in the comments. This feature is for public discussion of certain topics that you want the world to see. However this may not be suitable if the information submitted is private or confidential, or inappropriate. CIO Multimedia Comments professional edition gives you more control over what to show, what not to show, when and where to show, and who will have access. Please consider upgrading to the premium version if you need to restrict access to some contents of the discussion threads.
Summary
As shown in this tutorial, you may allow blog readers to upload images to comments and interact with you and other readers. Images are better than words in explaining a concept, especially if the images can be uploaded from smart mobile phones that people carry with them most of the time.
What Is Next?
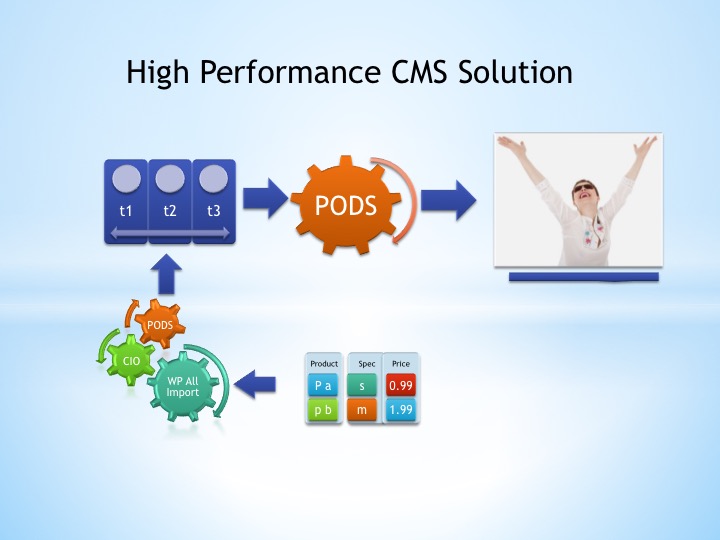
Pods is a powerful framework that can do much more than saving images and custom fields to a database as shown in this tutorial. It is a framework to build high performance content management system on WordPress platform. Your website can potentially speed up by a few times by changing custom fields storage and running optimised queries. The actual performance enhancement depends on how you use your custom fields and how you store custom fields. If your website is struggling with increasing number of custom fields, please contact us for an obligation free consultation of optimising your website. In many cases you can keep the appearance of your current website, with a much better engine to power your online system as your business grows.
Some of your business processes can be automated to save you significant time and money in the long run. This is especially the case where labor cost is high. CIO Custom Fields suite of tools are designed for small and medium businesses to have a high performance online presence with low running/maintaining cost. These tools are part of the solution to turn spreadsheet based data into automatically updated online system. Please contact us to find out how your business can benefit from our suite of tool, and our services.
if i use a single image upload (follow the tutorial) it´s ok! work fine!
But i cant upload Multiple Images…
If i try upload 2 or more images i have no thumbnail on comment.
Hi, thanks for your interest in the plugin. The free version only display one image per comment. The professional version of the plugin will display multiple images from the same comment, along with other extra features.